这几天看了关于Zygote进程相关知识点,感觉对这块又有了新的认识了,接下来结合自己的理解将相关知识点记录下来,一来是好记性不如烂笔头,记录下来有助于后期查阅,二来是想通过写博客的方式加深对知识点的理解,三来是想将知识共享出来给需要的人。
我们学习一个知识点首先要问下自己问啥要学习这个?我学习Zygote相关知识点是因为很久之前就听说过它是用来孵化进程的,但是不知道它的工作原理是什么。因为万变不离其宗,只有懂得了内在原理才能更好的看清事物的本质。好了废话不多说了,开始进入正题。
Zygote无论你之前有没有听说过,我希望通过本篇博客的学习,你至少能够知道:
1)它是做什么的?
2)它跟init进程的关系是什么?
3)它跟我们app进程有什么关系?
4)它的工作原理是什么?
1.Zygote的作用
Zygote顾名思义就是孵化,它是用来孵化和管理Android系统中所有应用进程,而它自己也是一个进程。Zygote在Android系统启动时就会被启动,它会先预加载一些常用的类和资源,以便后续的应用程序进程能够快速启动。当一个应用程序需要启动时,Zygote会fork一个新进程,并把一些已经加载好的类和资源共享给这个新进程,以提高应用程序的启动速度。
看到上面这段解释我们脑海中可能会出现很多问号,Zygote是怎么启动的?它是如何预加载类和资源的,为什么要预加载?它是怎么fork进程的?等等。我们先不用考虑,等放到后面讲原理的时候再讲解。
2.Android系统启动流程
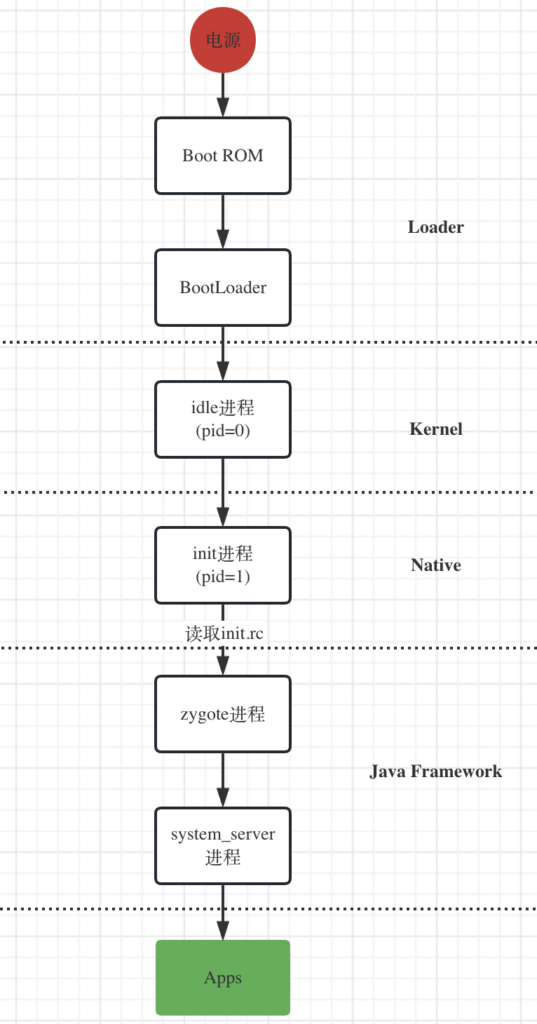
电源键按下后首先Boot ROM将引导程序BootLoader程序加载进内存中,接着BootLoader引导启动linux系统,系统起来后就开始启动0号进程idle,然后idle启动1号进程init,接着init进程会读取init.rc文件,这个文件实际上就是linux脚本,里面定义了各种需要启动的服务。Zygote进程就是init进程启动的进程之一,Zygote第一个fork出来的进程就是system_server进程,我们熟悉的AMS、PMS、WMS等Android框架层服务都是这个system_server进程启动的。在下一节的原理部分会详细介绍。
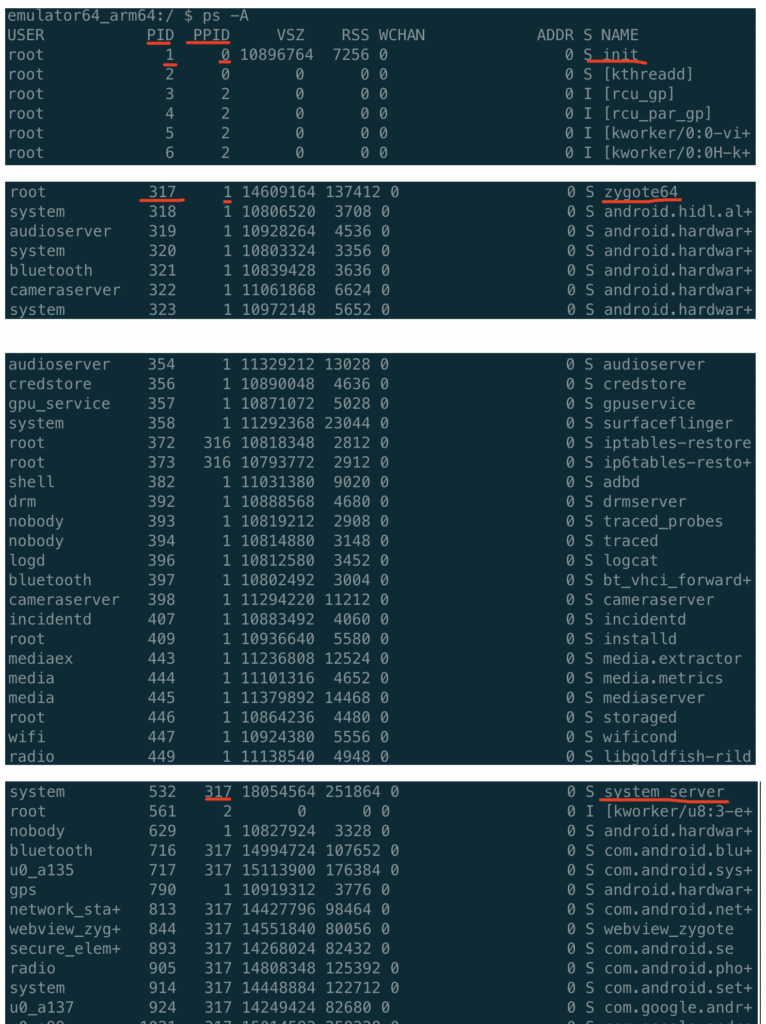
以上是执行adb shell后再执行ps -A看到的进程详情,PPID那一列是父进程号,PID列是当前进程号。可以看到audioservice、logcat、installd等服务都是由init进程启动的,这些进程是杀不掉的,当我们用kill -9 xxx来杀掉进程后,再次ps -A后会发现刚被杀掉的进程又会起来。init进程的主要作用就是 :1)启动系统关键服务。2)守护关键服务。
然后再看下关键进程zygote64,它的进程号是317(这个进程号是随机的),所有PPID是317的进程都是它来负责启动的,比如system_server进程。
看到这里有人会问:说了这么多你还没告诉我zygote到底有啥用?你上面说的system_server进程是它fork出来的,system_server又是干啥的?它的作用就是只启动system_server进程吗?别急,接下来希望通过下面的讲解,慢慢揭开zygote神秘的面纱。
3.原理讲解
(1)先看下system/core/rootdir/init.rc文件
import /init.environ.rc
import /system/etc/init/hw/init.usb.rc
import /init.${ro.hardware}.rc
import /vendor/etc/init/hw/init.${ro.hardware}.rc
import /system/etc/init/hw/init.usb.configfs.rc
import /system/etc/init/hw/init.${ro.zygote}.rc
......
引入了其他rc文件,再看下system/core/rootdir/init.zygote64.rc文件
service zygote /system/bin/app_process64 -Xzygote /system/bin --zygote --start-system-server
    class main
    priority -20
    user root
可以看到rc文件实际上是linux脚本文件,最终会通过service命令来启动zygote服务。那app_process又是什么?
zygote是通过app_process启动,看下frameworks/base/cmds/app_process/app_main.cpp
/*
 * Main entry of app process.
 *
 * Starts the interpreted runtime, then starts up the application.
 *
 */
int main(int argc, char* const argv[])
{
    if (!LOG_NDEBUG) {
      String8 argv_String;
      for (int i = 0; i < argc; ++i) {
        argv_String.append("\"");
        argv_String.append(argv[i]);
        argv_String.append("\" ");
      }
      ALOGV("app_process main with argv: %s", argv_String.string());
    }

    ......//省略

    AppRuntime runtime(argv[0], computeArgBlockSize(argc, argv));
    // Parse runtime arguments.  Stop at first unrecognized option.
    bool zygote = false;
    bool startSystemServer = false;
    bool application = false;
    String8 niceName;
    String8 className;

    ++i;  // Skip unused "parent dir" argument.
    while (i < argc) {
        const char* arg = argv[i++];
        if (strcmp(arg, "--zygote") == 0) {
            zygote = true;
            niceName = ZYGOTE_NICE_NAME;
        } else if (strcmp(arg, "--start-system-server") == 0) {
            startSystemServer = true;
        } else if (strcmp(arg, "--application") == 0) {
            application = true;
        } else if (strncmp(arg, "--nice-name=", 12) == 0) {
            niceName.setTo(arg + 12);
        } else if (strncmp(arg, "--", 2) != 0) {
            className.setTo(arg);
            break;
        } else {
            --i;
            break;
        }
    }

    .....//省略

    if (!niceName.isEmpty()) {
        runtime.setArgv0(niceName.string(), true /* setProcName */);
    }

    if (zygote) {
        runtime.start("com.android.internal.os.ZygoteInit", args, zygote);
    } else if (className) {
        runtime.start("com.android.internal.os.RuntimeInit", args, zygote);
    } else {
        fprintf(stderr, "Error: no class name or --zygote supplied.\n");
        app_usage();
        LOG_ALWAYS_FATAL("app_process: no class name or --zygote supplied.");
    }
}
service zygote /system/bin/app_process64 -Xzygote /system/bin --zygote --start-system-server 这段命令启动的服务最终会传入main函数中的argv参数,然后解析参数,具体代码从上面代码30行开始。
runtime.setArgv0(niceName.string(), true /* setProcName */);实际上是给app_process重新设置了另外一个名字zygote64。
AppRuntime runtime(argv[0], computeArgBlockSize(argc, argv));启动虚拟机。
runtime.start("com.android.internal.os.ZygoteInit", args, zygote);在虚拟机中运行ZygoteInit,ZygoteInit是java写的,即这一步Zygote就从native世界进入到了Java世界。
Zygote的java世界入口就是ZygoteInit类的main方法,看下frameworks/base/core/java/com/android/internal/os/ZygoteInit.java
public static void main(String[] argv) {
        ZygoteServer zygoteServer = null;

        ...... //省略

        Runnable caller;
        try {
            ...... //省略
            boolean startSystemServer = false;
            String zygoteSocketName = "zygote";
            String abiList = null;
            boolean enableLazyPreload = false;
            for (int i = 1; i < argv.length; i++) {
                if ("start-system-server".equals(argv[i])) {
                    startSystemServer = true;
                } else if ("--enable-lazy-preload".equals(argv[i])) {
                    enableLazyPreload = true;
                } else if (argv[i].startsWith(ABI_LIST_ARG)) {
                    abiList = argv[i].substring(ABI_LIST_ARG.length());
                } else if (argv[i].startsWith(SOCKET_NAME_ARG)) {
                    zygoteSocketName = argv[i].substring(SOCKET_NAME_ARG.length());
                } else {
                    throw new RuntimeException("Unknown command line argument: " + argv[i]);
                }
            }

            ...... //省略

            // In some configurations, we avoid preloading resources and classes eagerly.
            // In such cases, we will preload things prior to our first fork.
            if (!enableLazyPreload) {
                ......
                preload(bootTimingsTraceLog);
                ......
            }

            ......

            zygoteServer = new ZygoteServer(isPrimaryZygote);

            if (startSystemServer) {
                Runnable r = forkSystemServer(abiList, zygoteSocketName, zygoteServer);

                // {@code r == null} in the parent (zygote) process, and {@code r != null} in the
                // child (system_server) process.
                if (r != null) {
                    r.run();
                    return;
                }
            }

            Log.i(TAG, "Accepting command socket connections");

            // The select loop returns early in the child process after a fork and
            // loops forever in the zygote.
            caller = zygoteServer.runSelectLoop(abiList);
        } catch (Throwable ex) {
            Log.e(TAG, "System zygote died with fatal exception", ex);
            throw ex;
        } finally {
            if (zygoteServer != null) {
                zygoteServer.closeServerSocket();
            }
        }

        // We're in the child process and have exited the select loop. Proceed to execute the
        // command.
        if (caller != null) {
            caller.run();
        }
    }
ZygoteInit的main()方法是Android启动中的第一个Java进程的主方法。它主要完成几件事情,首先看下preload:
private static final String PRELOADED_CLASSES = "/system/etc/preloaded-classes";
static void preload(TimingsTraceLog bootTimingsTraceLog) {
    Log.d(TAG, "begin preload");
    bootTimingsTraceLog.traceBegin("BeginPreload");
    beginPreload();
    bootTimingsTraceLog.traceEnd(); // BeginPreload
    bootTimingsTraceLog.traceBegin("PreloadClasses");
    preloadClasses();
    bootTimingsTraceLog.traceEnd(); // PreloadClasses
    bootTimingsTraceLog.traceBegin("CacheNonBootClasspathClassLoaders");
    cacheNonBootClasspathClassLoaders();
    bootTimingsTraceLog.traceEnd(); // CacheNonBootClasspathClassLoaders
    bootTimingsTraceLog.traceBegin("PreloadResources");
    preloadResources();
    bootTimingsTraceLog.traceEnd(); // PreloadResources
    Trace.traceBegin(Trace.TRACE_TAG_DALVIK, "PreloadAppProcessHALs");
    nativePreloadAppProcessHALs();
    Trace.traceEnd(Trace.TRACE_TAG_DALVIK);
    Trace.traceBegin(Trace.TRACE_TAG_DALVIK, "PreloadGraphicsDriver");
    maybePreloadGraphicsDriver();
    Trace.traceEnd(Trace.TRACE_TAG_DALVIK);
    preloadSharedLibraries();
    preloadTextResources();
    // Ask the WebViewFactory to do any initialization that must run in the zygote process,
    // for memory sharing purposes.
    WebViewFactory.prepareWebViewInZygote();
    endPreload();
    warmUpJcaProviders();
    Log.d(TAG, "end preload");

    sPreloadComplete = true;
}
private static void preloadClasses() {
    final VMRuntime runtime = VMRuntime.getRuntime();

    InputStream is;
    try {
        is = new FileInputStream(PRELOADED_CLASSES);
    } catch (FileNotFoundException e) {
        Log.e(TAG, "Couldn't find " + PRELOADED_CLASSES + ".");
        return;
    }
    ......
 }
该方法预加载了虚拟机运行时所需的各类资源,比如上面的preloadClasses,就预加载了各种系统类。因为我们每个android应用程序都会用到系统资源,预加载后所有由zygote fork出来的应用进程都能共用一块内存。借用网上的图:
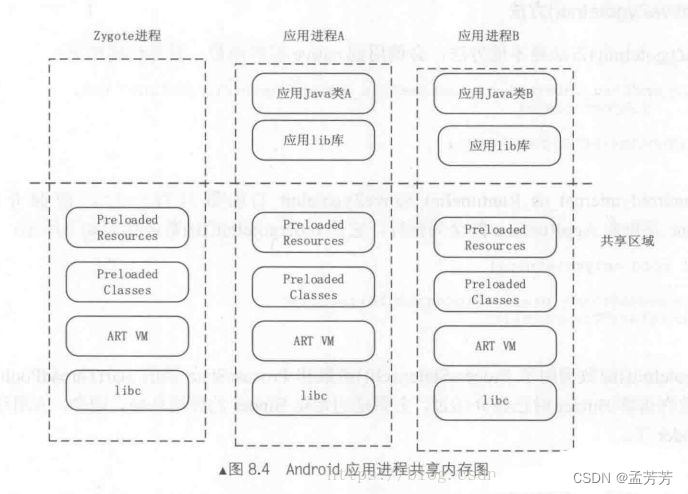
通过上图可以很容易理解在Zygote进程预加载系统资源后,然后通过它孵化出其他的虚拟机进程,进而共享虚拟机内存和框架层资源,这样大幅度提高应用程序的启动和运行速度。
zygoteServer = new ZygoteServer(isPrimaryZygote);创建一个socket服务端,用于等待AMS请求Zygote创建新的应用程序进程。forkSystemServer启动system_server服务。
class ZygoteServer {

    ZygoteServer(boolean isPrimaryZygote) {
        mUsapPoolEventFD = Zygote.getUsapPoolEventFD();

        if (isPrimaryZygote) {
            mZygoteSocket = Zygote.createManagedSocketFromInitSocket(Zygote.PRIMARY_SOCKET_NAME);
            mUsapPoolSocket =
                    Zygote.createManagedSocketFromInitSocket(
                            Zygote.USAP_POOL_PRIMARY_SOCKET_NAME);
        } else {
            mZygoteSocket = Zygote.createManagedSocketFromInitSocket(Zygote.SECONDARY_SOCKET_NAME);
            mUsapPoolSocket =
                    Zygote.createManagedSocketFromInitSocket(
                            Zygote.USAP_POOL_SECONDARY_SOCKET_NAME);
        }

        mUsapPoolSupported = true;
        fetchUsapPoolPolicyProps();
    }

    private ZygoteConnection acceptCommandPeer(String abiList) {
        try {
            return createNewConnection(mZygoteSocket.accept(), abiList);
        } catch (IOException ex) {
            throw new RuntimeException(
                    "IOException during accept()", ex);
        }
    }

    protected ZygoteConnection createNewConnection(LocalSocket socket, String abiList)
            throws IOException {
        return new ZygoteConnection(socket, abiList);
    }
}
重点看下runSelectLoop方法
/**
     * Runs the zygote process's select loop. Accepts new connections as
     * they happen, and reads commands from connections one spawn-request's
     * worth at a time.
     * @param abiList list of ABIs supported by this zygote.
     */
    Runnable runSelectLoop(String abiList) {
        ArrayList<FileDescriptor> socketFDs = new ArrayList<>();
        ArrayList<ZygoteConnection> peers = new ArrayList<>();

        // 将 zygote socket 的 fd加入数组
        socketFDs.add(mZygoteSocket.getFileDescriptor());
        peers.add(null);

        mUsapPoolRefillTriggerTimestamp = INVALID_TIMESTAMP;
        // 这里使用到了linux的poll机制
        while (true) {
            fetchUsapPoolPolicyPropsWithMinInterval();
            mUsapPoolRefillAction = UsapPoolRefillAction.NONE;

            int[] usapPipeFDs = null;
            StructPollfd[] pollFDs;

            // Allocate enough space for the poll structs, taking into account
            // the state of the USAP pool for this Zygote (could be a
            // regular Zygote, a WebView Zygote, or an AppZygote).
            if (mUsapPoolEnabled) {
                usapPipeFDs = Zygote.getUsapPipeFDs();
                pollFDs = new StructPollfd[socketFDs.size() + 1 + usapPipeFDs.length];
            } else {
                pollFDs = new StructPollfd[socketFDs.size()];
            }

            /*
             * For reasons of correctness the USAP pool pipe and event FDs
             * must be processed before the session and server sockets.  This
             * is to ensure that the USAP pool accounting information is
             * accurate when handling other requests like API deny list
             * exemptions.
             */

            int pollIndex = 0;
            for (FileDescriptor socketFD : socketFDs) {
                pollFDs[pollIndex] = new StructPollfd();
                pollFDs[pollIndex].fd = socketFD;
                pollFDs[pollIndex].events = (short) POLLIN;
                ++pollIndex;
            }

            final int usapPoolEventFDIndex = pollIndex;

            if (mUsapPoolEnabled) {
                pollFDs[pollIndex] = new StructPollfd();
                pollFDs[pollIndex].fd = mUsapPoolEventFD;
                pollFDs[pollIndex].events = (short) POLLIN;
                ++pollIndex;

                // The usapPipeFDs array will always be filled in if the USAP Pool is enabled.
                assert usapPipeFDs != null;
                for (int usapPipeFD : usapPipeFDs) {
                    FileDescriptor managedFd = new FileDescriptor();
                    managedFd.setInt$(usapPipeFD);

                    pollFDs[pollIndex] = new StructPollfd();
                    pollFDs[pollIndex].fd = managedFd;
                    pollFDs[pollIndex].events = (short) POLLIN;
                    ++pollIndex;
                }
            }

            int pollTimeoutMs;

            if (mUsapPoolRefillTriggerTimestamp == INVALID_TIMESTAMP) {
                pollTimeoutMs = -1;
            } else {
                long elapsedTimeMs = System.currentTimeMillis() - mUsapPoolRefillTriggerTimestamp;

                if (elapsedTimeMs >= mUsapPoolRefillDelayMs) {
                    // The refill delay has elapsed during the period between poll invocations.
                    // We will now check for any currently ready file descriptors before refilling
                    // the USAP pool.
                    pollTimeoutMs = 0;
                    mUsapPoolRefillTriggerTimestamp = INVALID_TIMESTAMP;
                    mUsapPoolRefillAction = UsapPoolRefillAction.DELAYED;

                } else if (elapsedTimeMs <= 0) {
                    // This can occur if the clock used by currentTimeMillis is reset, which is
                    // possible because it is not guaranteed to be monotonic.  Because we can't tell
                    // how far back the clock was set the best way to recover is to simply re-start
                    // the respawn delay countdown.
                    pollTimeoutMs = mUsapPoolRefillDelayMs;

                } else {
                    pollTimeoutMs = (int) (mUsapPoolRefillDelayMs - elapsedTimeMs);
                }
            }

            int pollReturnValue;
            try {
                pollReturnValue = Os.poll(pollFDs, pollTimeoutMs);
            } catch (ErrnoException ex) {
                throw new RuntimeException("poll failed", ex);
            }

            if (pollReturnValue == 0) {
                // The poll returned zero results either when the timeout value has been exceeded
                // or when a non-blocking poll is issued and no FDs are ready.  In either case it
                // is time to refill the pool.  This will result in a duplicate assignment when
                // the non-blocking poll returns zero results, but it avoids an additional
                // conditional in the else branch.
                mUsapPoolRefillTriggerTimestamp = INVALID_TIMESTAMP;
                mUsapPoolRefillAction = UsapPoolRefillAction.DELAYED;

            } else {
                boolean usapPoolFDRead = false;

                while (--pollIndex >= 0) {
                    //采用I/O多路复用机制,当客户端发出连接请求或者数据处理请求时,跳过continue,执行后面的代码
                    if ((pollFDs[pollIndex].revents & POLLIN) == 0) {
                        continue;
                    }

                    if (pollIndex == 0) {
                        //表示zygote socket中有连接到来,那么就要创建客户端连接
                        // 实际上就是执行socket accept操作
                        // 然后把创建的这个连接也加入到监听数组中,索引肯定大于0了
                        // 那么一旦这个连接中有数据来了,pollIndex肯定大于0
                        // Zygote server socket
                        ZygoteConnection newPeer = acceptCommandPeer(abiList);
                        peers.add(newPeer);
                        socketFDs.add(newPeer.getFileDescriptor());
                    } else if (pollIndex < usapPoolEventFDIndex) {
                        // Session socket accepted from the Zygote server socket

                        try {
                            ZygoteConnection connection = peers.get(pollIndex);
                            boolean multipleForksOK = !isUsapPoolEnabled()
                                    && ZygoteHooks.isIndefiniteThreadSuspensionSafe();
                            final Runnable command =
                                    connection.processCommand(this, multipleForksOK);

                            // TODO (chriswailes): Is this extra check necessary?
                            if (mIsForkChild) {
                                // We're in the child. We should always have a command to run at
                                // this stage if processCommand hasn't called "exec".
                                if (command == null) {
                                    throw new IllegalStateException("command == null");
                                }

                                return command;
                            } else {
                                // We're in the server - we should never have any commands to run.
                                if (command != null) {
                                    throw new IllegalStateException("command != null");
                                }

                                // We don't know whether the remote side of the socket was closed or
                                // not until we attempt to read from it from processCommand. This
                                // shows up as a regular POLLIN event in our regular processing
                                // loop.
                                if (connection.isClosedByPeer()) {
                                    connection.closeSocket();
                                    peers.remove(pollIndex);
                                    socketFDs.remove(pollIndex);
                                }
                            }
                        } catch (Exception e) {
                            ...
                        }

                    } else {
                        ...
                    }
                }

                ...
            }
            ...
        }
    }
ZygoteServer.runSelectLoop()方法实际上是一个死循环,是一个不断循环执行命令的方法。执行runSelectLoop()方法是为了等待消息去创建应用进程。
runSelectLoop()方法主要做两件事:
①每次循环都重新构建监听文件列表,主要是ZygoteServer的socket文件(ZygoteServer的socket和其他应用进程连接过来的socket)和usap文件节点。
②监听文件列表,并从中获取命令执行。
最后借用一幅图来总结下整个流程:
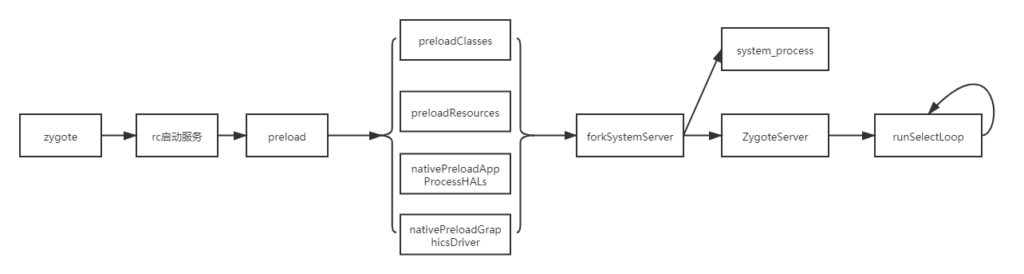
通过以上介绍,再回过头看看第1节介绍的zygote的作用,相信大家应该有稍微深刻点的认识了。总结下,init进程属于linux进程,init进程启动zygote进程,它属于java进程,zygote负责创建android应用进程和预加载应用程序启动必要的资源,其中比较重要的systemserver进程负责启动android中重要的服务,比如AMS、PMS、WMS等等。下一章中将介绍PMS相关知识点。
这篇文章写的也很不错:https://blog.csdn.net/zenmela2011/article/details/125330521