View测量是为布局打基础,因为测量的过程就是计算View的位置和尺寸的过程,有了位置和尺寸就可以将View正确的布局到屏幕上。涉及的方法有onMeasure()、measure()、onLayout()、layout()。
这几个方法的作用如下。
| onMeasure | View | 根据父View的要求和自己的特性,算出自己的期望尺寸。 |
| onMeasure | ViewGroup | 除了以上,还会调用子View的measure()进行测量,在子View得出期望尺寸后,得出子View的实际尺寸和位置。 |
| onLayout | ViewGroup | 调用每个子View的layout()把它们的尺寸和位置传给它们。 |
| measure | 父View调用子View的measure()进行测量。 | |
| layout | 父View调用子View的layout()传入它们的尺寸和位置。 子 View 在自己的 layout() 方法中,将父View传进来的自己的实际尺寸和位置保存。 |
一、如何简单的改写已有View的尺寸?
首先看下下面这张图,我们想要把这张矩形图变成正方形的。首先我们会想到固定ImageView的宽高,设置scaleType=centerCrop ,但是项目中如果有很多ImageView都要这样写就不太方便了,所以用自定义View。
class SquareImageView(context: Context, attrs: AttributeSet?) : AppCompatImageView(context, attrs) {

    override fun onMeasure(widthMeasureSpec: Int, heightMeasureSpec: Int) {
        super.onMeasure(widthMeasureSpec, heightMeasureSpec)

        val size = min(measuredWidth, measuredHeight)

        //保存起来,这样父view在需要的时候会从里面拿
        //因为父view拿到测量结果了
        setMeasuredDimension(size, size)
    }

    //重写layout同样可以达到这个效果
//    override fun layout(l: Int, t: Int, r: Int, b: Int) {
//
//        val width = r - l
//        val height = b - t
//
//        val size = min(width, height)
//
//        super.layout(l, t, l + size, t + size)
//    }
}
<?xml version="1.0" encoding="utf-8"?>
<LinearLayout xmlns:android="http://schemas.android.com/apk/res/android"
    android:layout_width="match_parent"
    android:layout_height="match_parent">

    <com.smart.dhu.test_layout.view.SquareImageView
        android:layout_width="300dp"
        android:layout_height="50dp"
        android:scaleType="centerCrop"
        android:src="@drawable/icon"/>

</LinearLayout>
效果图:
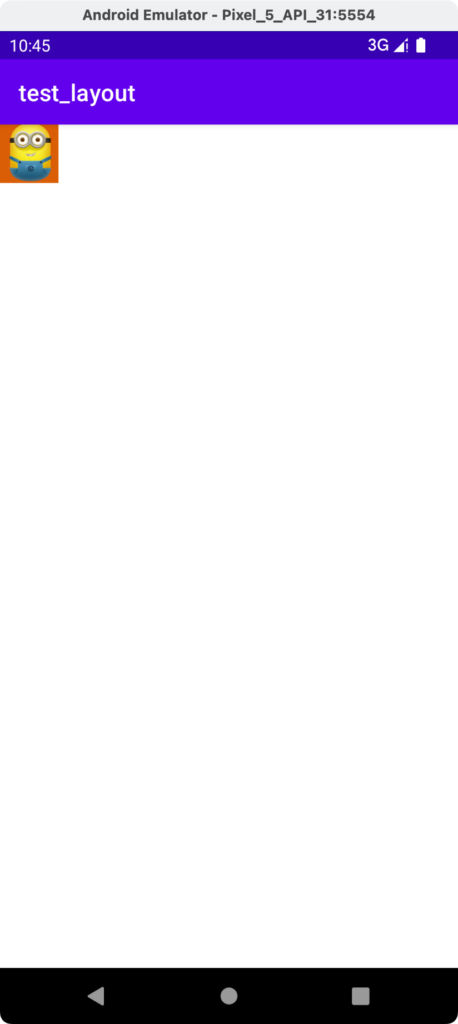
重写onMeasure和layout都能达到效果,但不能重写layout来实现,因为这里改了尺寸后父View是不知道的,会导致接下来的布局有问题。把上面代码的layout部分放开注释,然后布局文件改成如下:
<?xml version="1.0" encoding="utf-8"?>
<LinearLayout xmlns:android="http://schemas.android.com/apk/res/android"
    android:layout_width="match_parent"
    android:layout_height="match_parent">

    <com.smart.dhu.test_layout.view.SquareImageView
        android:layout_width="300dp"
        android:layout_height="50dp"
        android:scaleType="centerCrop"
        android:src="@drawable/icon"/>

    <View
        android:layout_width="300dp"
        android:layout_height="300dp"
        android:background="@android:color/holo_blue_dark"/>

</LinearLayout>
效果如下:
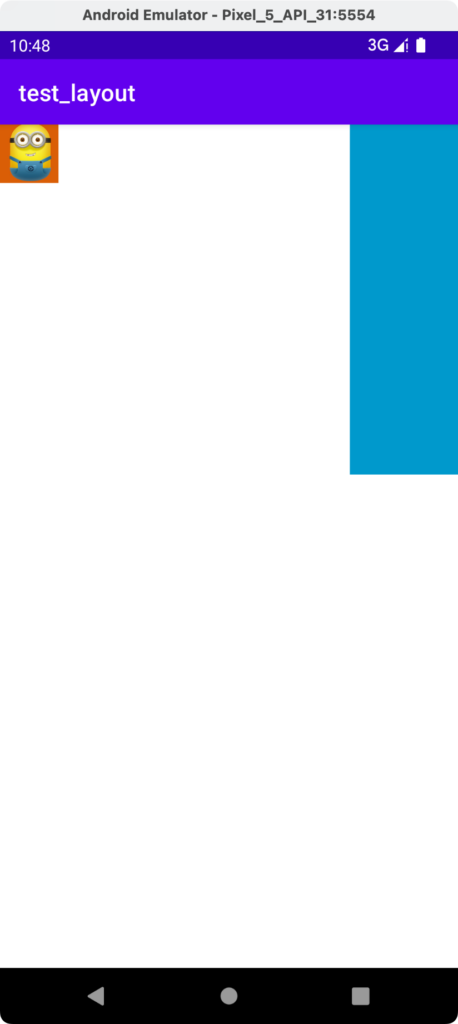
两个View中间空了很大一部分,这是因为父View——LinearLayout并不知道子View——SquareImageView做了尺寸修改,父View还是按照300dp来计算的宽度。
所以总结下,要修改View的尺寸可以按如下步骤:
- 重写onMeasure
- 使用getMeasuredWidth()和getMeasuredHeight()获取到测量出的尺寸
- 计算出最终要的尺寸
- 用setMeasuredDimension(width, height)把结果保存起来
接下来我们看下一个例子,代码和布局如下:
private const val RADIUS = 100f
private const val PADDING = 100f
class CircleView(context: Context?, attrs: AttributeSet?) : View(context, attrs) {

    private val paint = Paint(Paint.ANTI_ALIAS_FLAG)

    override fun onDraw(canvas: Canvas) {
        super.onDraw(canvas)
        canvas.drawCircle(PADDING + RADIUS, PADDING + RADIUS, RADIUS, paint)
    }
}
<?xml version="1.0" encoding="utf-8"?>
<LinearLayout xmlns:android="http://schemas.android.com/apk/res/android"
    android:layout_width="match_parent"
    android:layout_height="match_parent">

    <com.smart.dhu.test_layout.view.CircleView
        android:layout_width="wrap_content"
        android:layout_height="wrap_content"
        android:background="@android:color/holo_green_dark" />

</LinearLayout>
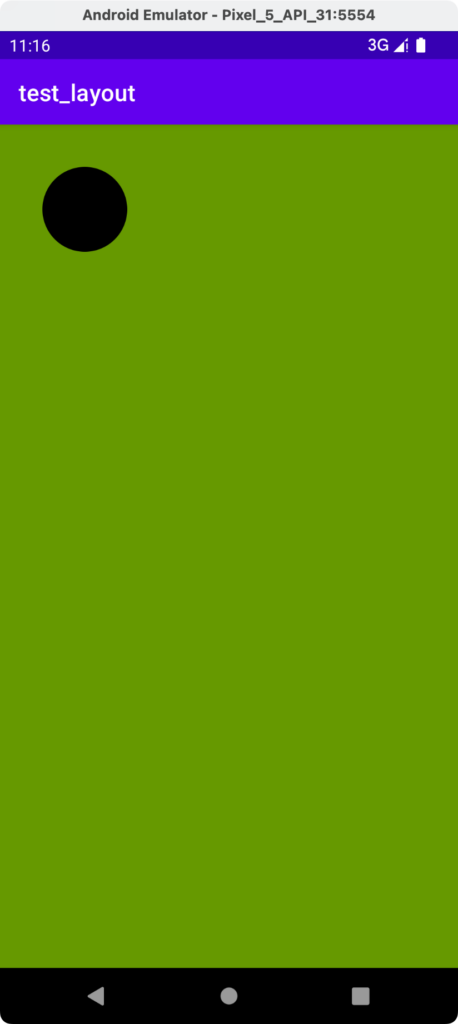
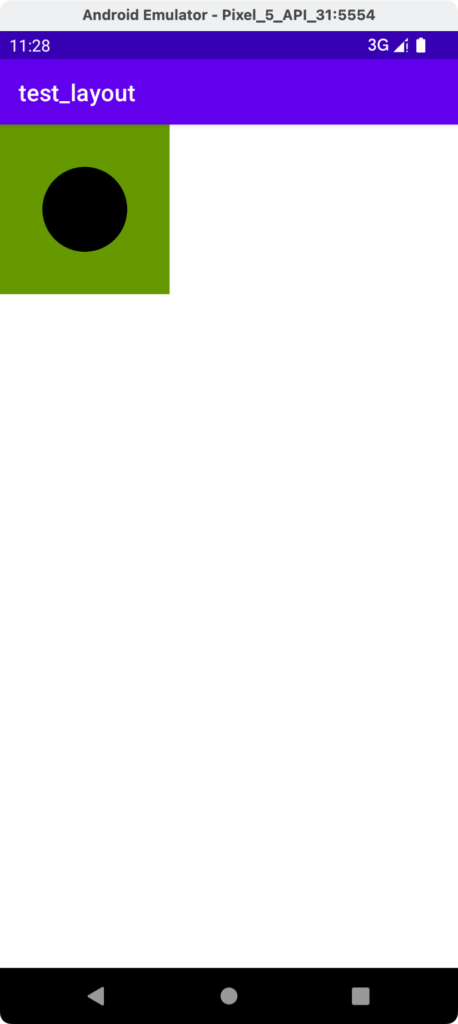
代码很简单,就画了一个圆,但其实是有问题的——CircleView充满了整个屏幕。那如何让CircleView正好就是代码中规定的尺寸呢?接下来我们进入下一小节。
二、如何完全自定义View的尺寸?
我们已经知道onMeasure()中实际上子View已经根据父View的要求和自己的特性算出来了自己的期望尺寸。所以既然上面父View帮我们算出来的尺寸比符合要求,我们就不要让父View给我们算。看下面修改后的代码:
private const val RADIUS = 100f
private const val PADDING = 100f
class CircleView(context: Context?, attrs: AttributeSet?) : View(context, attrs) {

    private val paint = Paint(Paint.ANTI_ALIAS_FLAG)

    //widthMeasureSpec和heightMeasureSpec是父view给的意见
    override fun onMeasure(widthMeasureSpec: Int, heightMeasureSpec: Int) {
        //父view怎么量跟我没关系,所以这个就不需要了
        //super.onMeasure(widthMeasureSpec, heightMeasureSpec)

        val size = ((PADDING + RADIUS) * 2).toInt()
        setMeasuredDimension(size, size)

    }

    override fun onDraw(canvas: Canvas) {
        super.onDraw(canvas)
        canvas.drawCircle(PADDING + RADIUS, PADDING + RADIUS, RADIUS, paint)
    }
}
貌似是能达到效果的。但这样有个问题,这样就会导致布局中设置CircleView的宽高就没有作用了,因为onMeasure()中就没考虑父View给的宽高意见。所以要把父View给的宽高意见考虑进去,修改后的代码如下:
private const val RADIUS = 100f
private const val PADDING = 100f
class CircleView(context: Context?, attrs: AttributeSet?) : View(context, attrs) {

    private val paint = Paint(Paint.ANTI_ALIAS_FLAG)

    //widthMeasureSpec和heightMeasureSpec是父view给的意见
    override fun onMeasure(widthMeasureSpec: Int, heightMeasureSpec: Int) {
        //父view怎么量跟我没关系,所以这个就不需要了
        //super.onMeasure(widthMeasureSpec, heightMeasureSpec)

       //自己量
        val size = ((PADDING + RADIUS) * 2).toInt()
        // setMeasuredDimension(size, size)

        //但是要结合父view的意见来修正,就是要听开发者的意见
        val specWidthMode = MeasureSpec.getMode(widthMeasureSpec)
        val specWidthSize = MeasureSpec.getSize(widthMeasureSpec)

        val width = when (specWidthMode) {
            //精确值,测量就没意义了,以精确值为准
            MeasureSpec.EXACTLY -> specWidthSize
            //最大值,计算的值不超过我设置的,以计算的值为准,否则以限制的上限为准
            MeasureSpec.AT_MOST -> min(size, specWidthSize)
            //不限制
            else -> size
        }
        setMeasuredDimension(width, width)

    }

    override fun onDraw(canvas: Canvas) {
        super.onDraw(canvas)
        canvas.drawCircle(PADDING + RADIUS, PADDING + RADIUS, RADIUS, paint)
    }
}
上面只修正了width的值,height的值按同样的算法修改即可,这里就不写了,所以偷个懒,上面的setMeasuredDimension()都设置为width。
通过以上修改,就能在布局中设置CircleView的宽高了。代码注释的比较详细,这里做个简单的补充。首先是widthMeasureSpec(heightMeasureSpec类似),这个值里面包含了两个信息,一个是测量的模式,一个是测量的尺寸,需要结合这两个值以及自己的期望尺寸来计算实际的尺寸。注意最后要调用setMeasuredDimension()把测量的结果保存起来给父View使用。
上面代码还可以优化,其实onMeasure里面的一大坨算法Android已经帮我们实现了,代码修改如下:
private const val RADIUS = 100f
private const val PADDING = 100f
class CircleView(context: Context?, attrs: AttributeSet?) : View(context, attrs) {

    private val paint = Paint(Paint.ANTI_ALIAS_FLAG)

    override fun onMeasure(widthMeasureSpec: Int, heightMeasureSpec: Int) {
       //自己量
        val size = ((PADDING + RADIUS) * 2).toInt()
        //以上不用我们自己写,android已经帮我们实现了
        val width = resolveSize(size, widthMeasureSpec)
        val height = resolveSize(size, heightMeasureSpec)

        setMeasuredDimension(width, height)

    }

    override fun onDraw(canvas: Canvas) {
        super.onDraw(canvas)
        canvas.drawCircle(PADDING + RADIUS, PADDING + RADIUS, RADIUS, paint)
    }
}
通过resolveSize()就实现了宽高的修正,是不是很简单。
三、自定义Layout。
有了上面的铺垫后,接下来我们就来一起研究下,如何自定义Layout。
我们都知道LinearLayout、FrameLayout、ConstraintLayout等都已经帮我们实现了布局的方式,我们只需要往里面加子View就行了,这些Layout的算法决定了最终呈现的布局样式。那我们可不可以实现一个自己的Layout呢?首先我们看看下面这个效果。
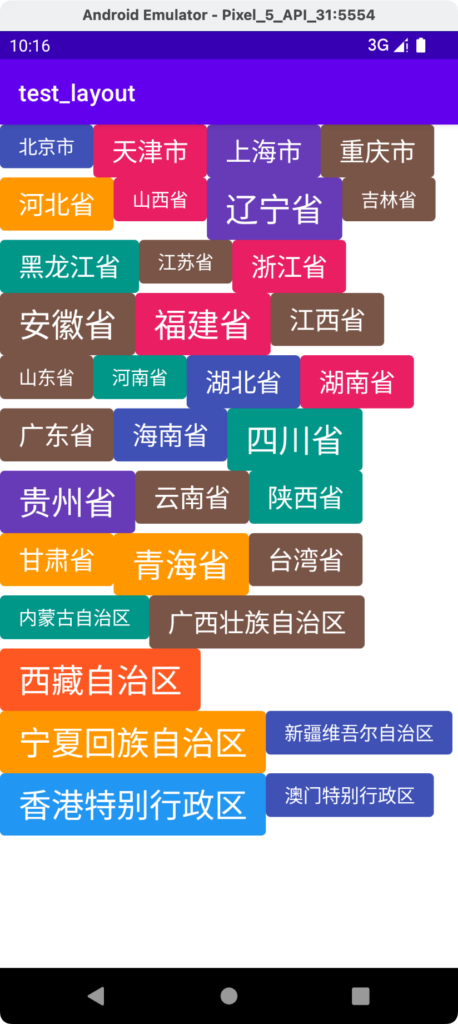
每个View都有自己的大小,当一行放不下的时候会自动换到下一行,下一行的top起始位置是上一行最高的那个View的高度,Android自带的布局是没法实现这个效果的。接下来我们分三步来实现自定义Layout。
1.先实现单个View的布局效果。
自定义TextView比较简单,就直接贴代码了,自定义ColoredTextView如下:
private val COLORS = intArrayOf(
  Color.parseColor("#E91E63"),
  Color.parseColor("#673AB7"),
  Color.parseColor("#3F51B5"),
  Color.parseColor("#2196F3"),
  Color.parseColor("#009688"),
  Color.parseColor("#FF9800"),
  Color.parseColor("#FF5722"),
  Color.parseColor("#795548")
)
private val TEXT_SIZES = intArrayOf(16, 22, 28)
private val CORNER_RADIUS = 4.dp
private val X_PADDING = 16.dp.toInt()
private val Y_PADDING = 8.dp.toInt()

class ColoredTextView(context: Context, attrs: AttributeSet?) : AppCompatTextView(context, attrs) {
  private var paint = Paint(Paint.ANTI_ALIAS_FLAG)
  private val random = Random()

  init {
    setTextColor(Color.WHITE)
    textSize = TEXT_SIZES[random.nextInt(3)].toFloat()
    paint.color = COLORS[random.nextInt(COLORS.size)]
    setPadding(X_PADDING, Y_PADDING, X_PADDING, Y_PADDING)
  }

  override fun onDraw(canvas: Canvas) {
    canvas.drawRoundRect(0f, 0f, width.toFloat(), height.toFloat(), CORNER_RADIUS, CORNER_RADIUS, paint)
    super.onDraw(canvas)
  }
}
实现了一个随机字体大小的自定义TextView。
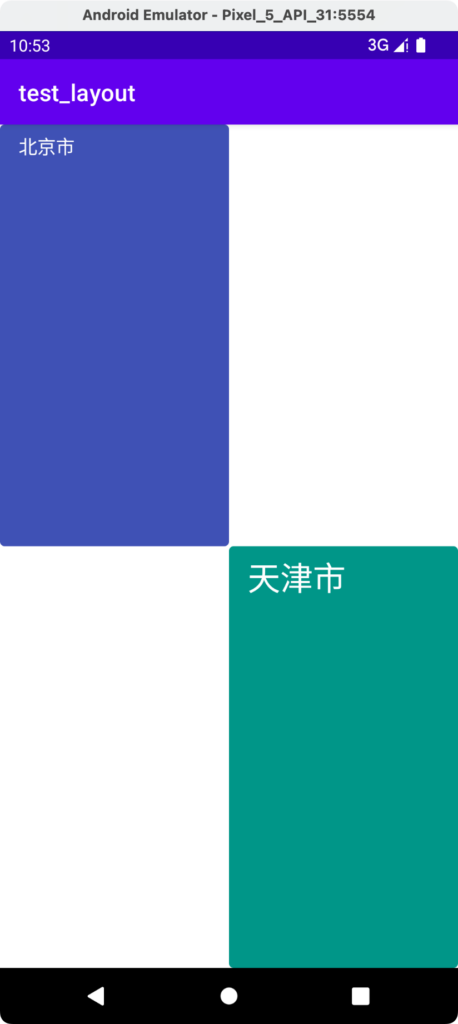
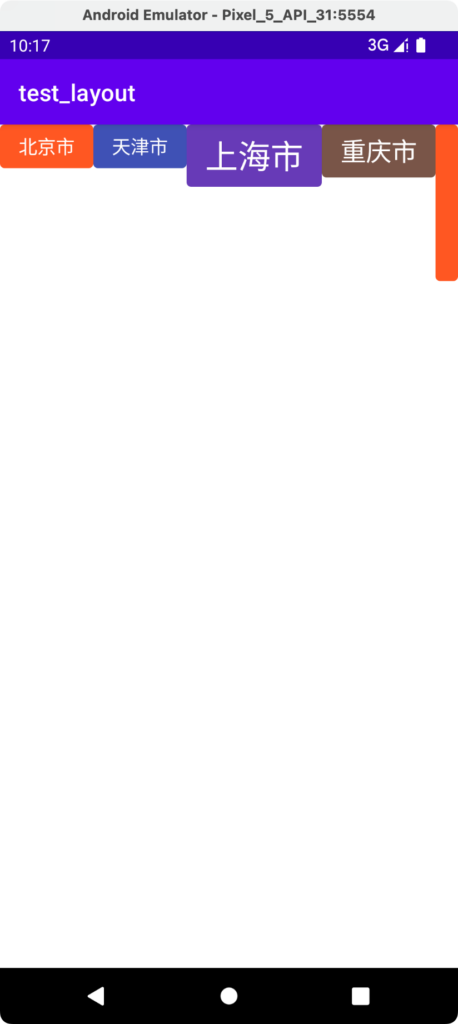
先做个简单的布局,左上角和右下角各一个ColoredTextView,常规的ConstraintLayout或者其他Layout的组合都能实现,接下来我们自己写一个这样的Layout,其实很简单运用上面所学的知识,我们知道ViewGroup中在onLayout中布局所有子View,将它们各自的位置通过layout()传给它们。所以代码如下:
class TagTwoLayout(context: Context?, attrs: AttributeSet?) : ViewGroup(context, attrs) {
    override fun onLayout(changed: Boolean, l: Int, t: Int, r: Int, b: Int) {

        for (child in children) {
            if (children.indexOf(child) == 0) {
                child.layout(0, 0, (r - l) / 2, (b - t) / 2)
            } else {
                child.layout((r - l) / 2, (b - t) / 2, r, b)
            }
        }
    }
}
布局如下:
<?xml version="1.0" encoding="utf-8"?>
<com.smart.dhu.test_layout.view.TagTwoLayout xmlns:android="http://schemas.android.com/apk/res/android"
    android:layout_width="match_parent"
    android:layout_height="match_parent">

    <com.smart.dhu.test_layout.view.ColoredTextView
        android:layout_width="wrap_content"
        android:layout_height="wrap_content"
        android:text="北京市" />

    <com.smart.dhu.test_layout.view.ColoredTextView
        android:layout_width="wrap_content"
        android:layout_height="wrap_content"
        android:text="天津市" />

</com.smart.dhu.test_layout.view.TagTwoLayout>
效果如图:
2.先实现单行布局效果。
通过以上我们可知,想要实现复杂的布局,首先得有每个子View的位置信息,然后就可以在onLayout()中根据计算好的位置信息直接布局即可。所以就有了下面这个框架。
class TagSingleRowLayout(context: Context?, attrs: AttributeSet?) : ViewGroup(context, attrs) {

    private val childrenBounds = mutableListOf<Rect>()

    override fun onMeasure(widthMeasureSpec: Int, heightMeasureSpec: Int) {
        super.onMeasure(widthMeasureSpec, heightMeasureSpec)

        //计算出每个子View的位置信息并存入childrenBounds中
    }

    override fun onLayout(changed: Boolean, l: Int, t: Int, r: Int, b: Int) {
        for ((index, child) in children.withIndex()) {
            val childBound = childrenBounds[index]
            child.layout(childBound.left, childBound.top, childBound.right, childBound.bottom)
        }
    }
}
我们的目标是实现单行布局,布局的思路就是先摆第1个View,再基于第1个的位置往右边摆第2个View,再基于第2个View的位置往右边摆第3个,以此类推。所以每个View都是基于前一个View已经使用的宽度,另外还要结合父View的特性来一起计算出自己的位置。修改后的框架如下:
class TagLayout(context: Context?, attrs: AttributeSet?) : ViewGroup(context, attrs) {

    private val childrenBounds = mutableListOf<Rect>()

    override fun onMeasure(widthMeasureSpec: Int, heightMeasureSpec: Int) {

        val widthSpecMode = MeasureSpec.getMode(widthMeasureSpec)
        val widthSpecSize = MeasureSpec.getSize(widthMeasureSpec)

        for ((index, child) in children.withIndex()) {
            val layoutParams = child.layoutParams
            var childWidthSpecMode = 0
            var childWidthSpecSize = 0

            when (layoutParams.width) {
                LayoutParams.MATCH_PARENT -> {
                    when (widthSpecMode) {
                        MeasureSpec.EXACTLY, MeasureSpec.AT_MOST -> {
                            childWidthSpecMode = MeasureSpec.EXACTLY
                            childWidthSpecSize = widthSpecSize - widthUsed
                        }
                        MeasureSpec.UNSPECIFIED -> {
                            childWidthSpecMode = MeasureSpec.UNSPECIFIED
                            childWidthSpecSize = 0
                        }
                    }
                }
                LayoutParams.WRAP_CONTENT -> {
                    when (widthSpecMode) {
                        MeasureSpec.EXACTLY, MeasureSpec.AT_MOST -> {
                            childWidthSpecMode = MeasureSpec.AT_MOST
                            childWidthSpecSize = widthSpecSize - widthUsed
                        }
                        MeasureSpec.UNSPECIFIED -> {
                            childWidthSpecMode = MeasureSpec.UNSPECIFIED
                            childWidthSpecSize = 0
                        }
                    }
                }
                else -> {
                    childWidthSpecMode = MeasureSpec.EXACTLY
                    childWidthSpecSize = layoutParams.width
                }
            }

            child.measure(childWidthSpecMode, childWidthSpecSize)
        }
    }

    override fun onLayout(changed: Boolean, l: Int, t: Int, r: Int, b: Int) {
        for ((index, child) in children.withIndex()) {
            val childBound = childrenBounds[index]
            child.layout(childBound.left, childBound.top, childBound.right, childBound.bottom)
        }
    }
}
上面代码都是运行不了的,主要是让大家先了解下布局的思路是啥。接下来对上面代码作详细解释。
首先拿到父View的widthSpecMode、widthSpecSize。for循环里面遍历出每个子View,并计算每个子View的childWidthSpecMode、childWidthSpecSize,最后调用measure()来算出子View的位置。
最外层的when根据开发者给每个子View的要求来计算,当开发者要求子View的width=LayoutParams.MATCH_PARENT时,结合父View的模式,当父View的widthSpecMode=MeasureSpec.EXACTLY时,大家可以开动脑筋想象一下:
子View是要求填充满,widthSpecMode是TagLayout的父View给它的模式,告诉TagLayout是精确值,看下面图更直观些。
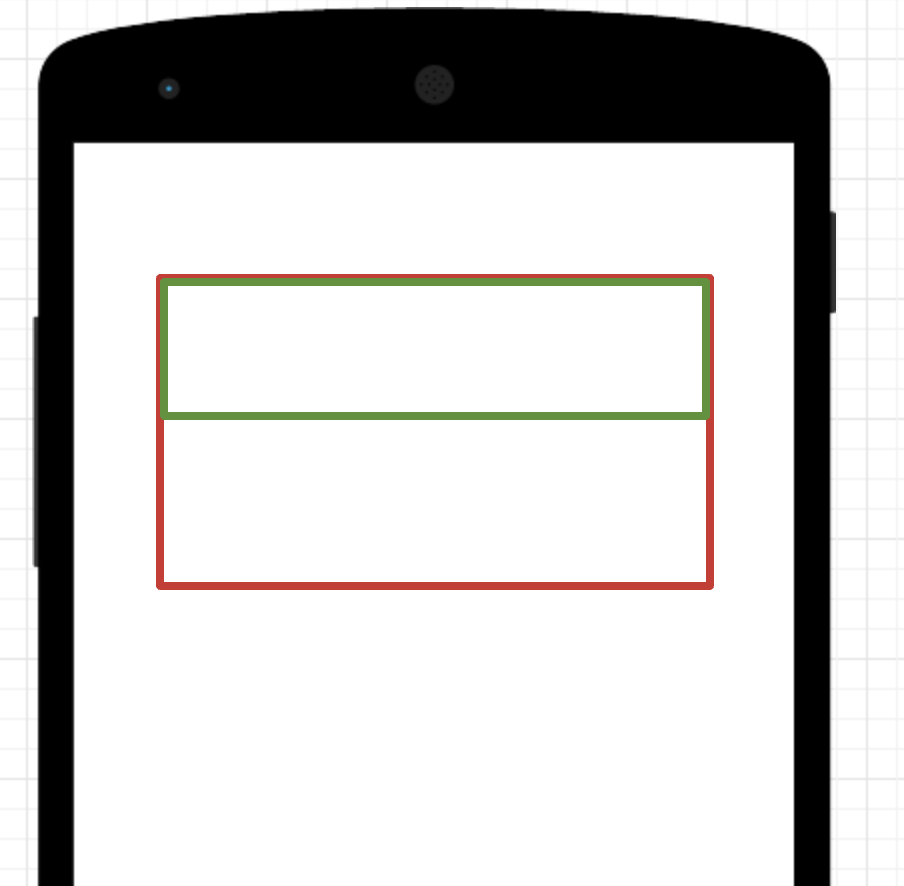
假如红色部分TagLayout,绿色部分是子View,TagLayout已经是MeasureSpec.EXACTLY了,绿色部分要求MATCH_PARENT,肯定就是图中的效果了。
同理,子View要求填充满,但是TagLayout的模式是MeasureSpec.AT_MOST,也就是TagLayout的父亲告诉它,你最多只能这么大,所以沿用的跟MeasureSpec.EXACTLY的模式也是一样的。
当子View的宽度大小是WRAP_CONTENT时,我们也给它设置了一个布局算法,这个算法看业务需要而实现,大家根据源码自行分析。
其实上面的算法可以用一个方法代替,这个方法Android已经替我们实现了,就是measureChildWithMargins(),修改后的代码如下:
class TagLayout(context: Context?, attrs: AttributeSet?) : ViewGroup(context, attrs) {

    private val childrenBounds = mutableListOf<Rect>()

    override fun onMeasure(widthMeasureSpec: Int, heightMeasureSpec: Int) {

        var widthUsed = 0
        var heightUsed = 0
        var maxLineHeight = 0

        for ((index, child) in children.withIndex()) {
            measureChildWithMargins(child, widthMeasureSpec, widthUsed, heightMeasureSpec, heightUsed)

            if (index >= childrenBounds.size) {
                childrenBounds.add(Rect())
            }
            val childBounds = childrenBounds[index]
            childBounds.set(widthUsed, heightUsed, widthUsed + child.measuredWidth, heightUsed + child.measuredHeight)

            //更新下widthUsed
            widthUsed += child.measuredWidth
            maxLineHeight = max(maxLineHeight, child.measuredHeight)
        }

        val selfWidth = widthUsed
        val selfHeight = maxLineHeight
        setMeasuredDimension(selfWidth, selfHeight)
    }

    override fun onLayout(changed: Boolean, l: Int, t: Int, r: Int, b: Int) {
        for ((index, child) in children.withIndex()) {
            val childBound = childrenBounds[index]
            child.layout(childBound.left, childBound.top, childBound.right, childBound.bottom)
        }
    }

    //要重写,否则会报错
    override fun generateLayoutParams(attrs: AttributeSet?): LayoutParams {
        return MarginLayoutParams(context, attrs)
    }
}
通过measureChildWithMargins()我们就能算出子View的大小,每次for循环最后要记得更新widthUsed的值,也就是已经使用了多少宽度,这个值是累加的。另外由于子View的高度也是随机的,所以每次for循环最后同样要更新最大高度,为下一小节我们实现多行效果做铺垫。最终效果如下图:
3.再实现多行布局效果。
上面带着大家一起实现了单行效果,其核心就是利用了measureChildWithMargins()来计算出子View的实际大小和位置。接下来我们来研究下多行如何实现?
首先我们要思考下,什么时候换行?很显然,当一行已经使用的宽度大于父View的宽度就要换行。一行已经使用的宽度,这个要咋计算?因为我们布局的算法是从左向右,从上往下的,先布局第一行,一个个的往后布局,当布局到某个子View时,如果发现此时已经使用的宽度+即将要布局的子View的宽度>父View的宽度时,我们就认为需要换行了,而换行后的起始位置X轴坐标是0,Y轴坐标其实就是上一行的最大高度。
有了上面的基本思路,我们再看下下面的代码就很容易理解了:
class TagLayout(context: Context?, attrs: AttributeSet?) : ViewGroup(context, attrs) {

    private val childrenBounds = mutableListOf<Rect>()

    override fun onMeasure(widthMeasureSpec: Int, heightMeasureSpec: Int) {
        var widthUsed = 0
        var heightUsed = 0
        var maxLineHeight = 0
        var lineWidthUsed = 0
        val specWidthSize = MeasureSpec.getSize(widthMeasureSpec)
        val specWidthMode = MeasureSpec.getMode(widthMeasureSpec)

        for ((index, child) in children.withIndex()) {
            measureChildWithMargins(child, widthMeasureSpec, 0, heightMeasureSpec, heightUsed)

            //已经使用的宽度加上child自己的宽度,如果大于父View的宽度,就要换行
            if (specWidthMode != MeasureSpec.UNSPECIFIED &&
                lineWidthUsed + child.measuredWidth > specWidthSize) {
                //换行后要重置一些变量
                heightUsed += maxLineHeight
                maxLineHeight = 0
                lineWidthUsed = 0

                //重置完了以后要重新测量
                measureChildWithMargins(child, widthMeasureSpec, 0, heightMeasureSpec, heightUsed)
            }

            if (index >= childrenBounds.size) {
                childrenBounds.add(Rect())
            }
            val childBounds = childrenBounds[index]
            childBounds.set(lineWidthUsed, heightUsed, lineWidthUsed + child.measuredWidth, heightUsed + child.measuredHeight)

            //更新下widthUsed
            lineWidthUsed += child.measuredWidth
            widthUsed = max(widthUsed, lineWidthUsed)
            maxLineHeight = max(maxLineHeight, child.measuredHeight)
        }

        val selfWidth = widthUsed
        //这里要注意
        val selfHeight = heightUsed + maxLineHeight
        setMeasuredDimension(selfWidth, selfHeight)
    }

    override fun onLayout(changed: Boolean, l: Int, t: Int, r: Int, b: Int) {
        for ((index, child) in children.withIndex()) {
            val childBound = childrenBounds[index]
            child.layout(childBound.left, childBound.top, childBound.right, childBound.bottom)
        }
    }

    //要重写,否则会报错
    override fun generateLayoutParams(attrs: AttributeSet?): LayoutParams {
        return MarginLayoutParams(context, attrs)
    }
}
比较关键的是for里面的第一个if判断,这里面是核心,可以看到除了for一开始通过measureChildWithMargins()计算了子View的尺寸信息以外,在if里面同样又做了一次计算。这是因为换行了,位置变了,所以要重新根据父View的可用空间来计算子View的尺寸。还有个容易忽略的地方是最后的setMeasuredDimension(),这个方法调用的目的是把自己的尺寸信息告知父View,这样父View在布局的时候才能正确的布局下一个子View,否则就会出现第一部分所讲的问题。
至此,自定义Layout就讲完了,核心就是onMeasure和onLayout方法,以及对widthMeasureSpec和heightMeasureSpec的理解。
在此感谢扔物线。