annotationProcessor、kapt、KSP都是注解处理工具,用于在编译时处理注解并生成代码。
一、annotationProcessor
annotationProcessor是Java注解工具。详细的使用可以参考我之前写的一篇文章。
二、kapt
kapt (Kotlin Annotation Processing Tool) 是Kotlin编译器的注解处理工具,它的作用是使Kotlin项目能够使用为Java设计的注解处理器。因为Kotlin编译器本身不能把Kotlin源码当成Java源码来交给Java注解处理器处理。
关于它的原理,以下是ChatGPT的回答,大家可以参考:
kapt 在编译流程中插入一个“桥”步骤,典型流程为:
1. Kotlin 源码 → 生成 Java stub(或 classfile 抽象信息):kapt 会把 Kotlin 的类/接口等生成对应的 Java 风格“存根(stubs)”,这些 stub 表示类结构、注解与签名,但不包含 Kotlin 特定实现细节。
2.使用 Java Annotation Processing API(javax.annotation.processing) 在这些 stub 上运行现有的 Java 注解处理器(annotation processors)。处理器可以读取注解、类型信息,生成 Java 源文件(或其他资源)。
3.kapt 把注解处理器生成的源文件合并回编译流程:这些生成的 Java 源会被 javac 编译并最终与 Kotlin 编译产物一起打包。
4.最终产物包含 Kotlin 编译结果与注解处理器生成并编译的类。
另外:如果是纯kotlin项目,建议优先使用KSP,因为kapt会增加编译时间。
三、KSP
接下来要讲的就是我们今天的主角——KSP (Kotlin Symbol Processing) 是专门为Kotlin设计的编译期符号处理工具。说的直白点就是为Kotlin设计的注解处理工具。
先看看KSP的用法,拿Room数据库的使用方式来举例。
(1)将KSP插件添加到项目中
首先,在主项目的build.gradle.kts 文件中声明 KSP 插件。请务必选择与项目的 Kotlin 版本一致的 KSP 版本。可以在 KSP GitHub 页面上找到版本列表。
注意 :KSP 版本的前一部分必须与 build 中使用的 Kotlin 版本一致。例如,如果您使用的是 Kotlin2.0.21,则 KSP 版本必须是2.0.21-x.y.z版本之一。
plugins {
    id("com.google.devtools.ksp") version "2.0.21-1.0.27" apply false
}
然后,在模块级 build.gradle.kts 文件中启用 KSP:
plugins {
    id("com.google.devtools.ksp")
}
(2)将注解处理器替换为 KSP
dependencies {
    ksp("androidx.room:room-compiler:2.5.0")
}
以上就是KSP的使用,是不是很简单。
那接下来就尝试自己实现一个自定义注解和注解处理器吧。
四、自定义注解和注解处理器
实现一个BindView的功能,跟我之前写的这篇文章类似。
(1)创建lib_annotations项目,并创建BindView注解。
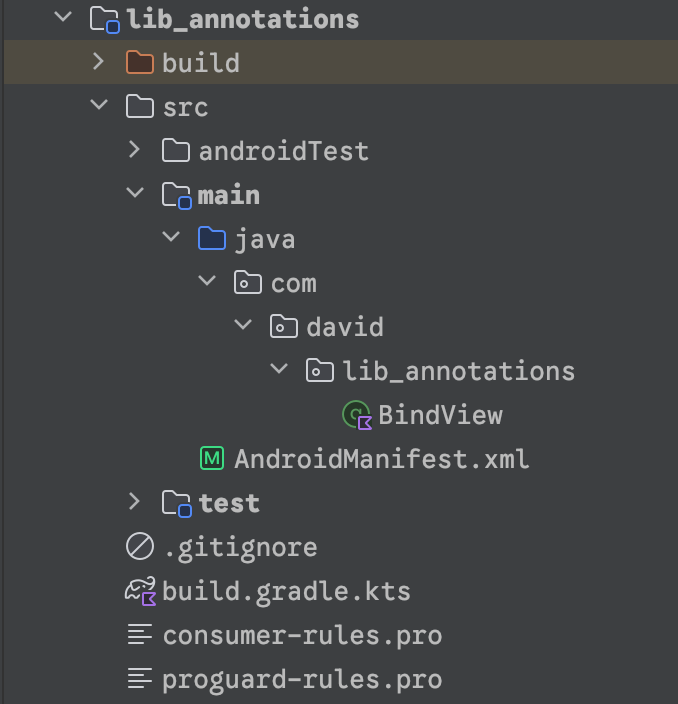
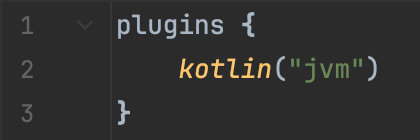
build.gradle.kts中只保留如下配置,其余配置都删掉。
BindView注解:
//保留的意思 只在编译时用
@Retention(AnnotationRetention.SOURCE)
//作用范围
@Target(AnnotationTarget.FIELD)
annotation class BindView(val value: String)
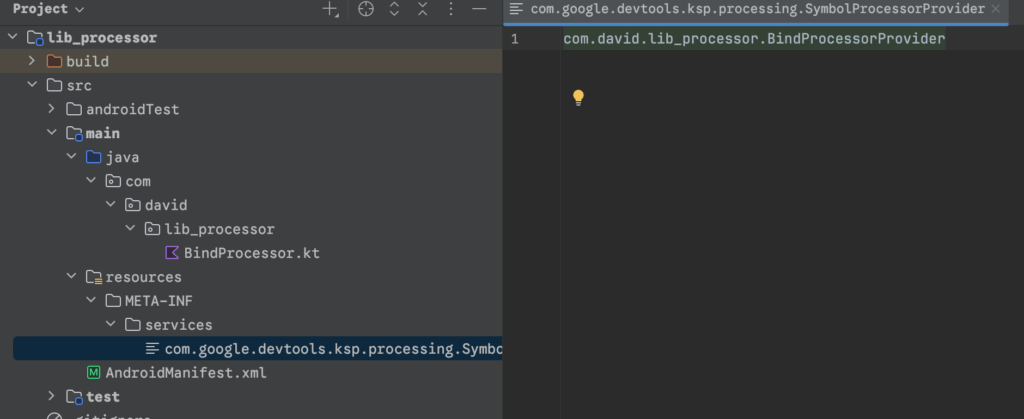
(2)创建lib_processor项目,并创建注解处理器BindProcessor。
build.gradle.kts配置如下
//以下是toml文件中的定义
kotlin = "2.2.20"
ksp = "2.2.20-2.0.2"
kotlinpoet = "2.2.0"

[libraries]
ksp-api = { module = "com.google.devtools.ksp:symbol-processing-api", version.ref = "ksp" }
kotlinpoet-ksp = { module = "com.squareup:kotlinpoet-ksp", version.ref = "kotlinpoet" }
[plugins]
kotlin-android = { id = "org.jetbrains.kotlin.android", version.ref = "kotlin" }

//以下是build.gradle.kts中的配置
plugins {
    kotlin("jvm")
    alias(libs.plugins.ksp)
}

dependencies {
    compileOnly(libs.ksp.api)
    implementation(libs.kotlinpoet.ksp)
    implementation(project(":lib_annotations"))
}
其中kotlinpoet是方便我们创建Kotlin源文件的。
BindProcessor源码:
class BindProcessor(
    private val codeGenerator: CodeGenerator,
    private val logger: KSPLogger
) : SymbolProcessor {
    override fun process(resolver: Resolver): List<KSAnnotated> {
        // 查找带 @BindView 的类
        val bindViewSymbols = resolver.getSymbolsWithAnnotation(BindView::class.qualifiedName!!)
        val ret = bindViewSymbols.filter { !it.validate() }.toList()
        bindViewSymbols
            .filter { it.validate() }
            .filterIsInstance<KSPropertyDeclaration>()
            .groupBy { it.parentDeclaration }
            .forEach { classDeclaration, properties ->
                if (classDeclaration is KSClassDeclaration) {
                    generateBindingClass(classDeclaration, properties, resolver)
                }
            }
        return ret
    }

    private fun generateBindingClass(
        classDeclaration: KSClassDeclaration,
        properties: List<KSPropertyDeclaration>,
        resolver: Resolver
    ) {
        val packageName = classDeclaration.packageName.asString()
        val className = "${classDeclaration.simpleName.asString()}ViewBinding"
        logger.info("Generating binding class: $packageName.$className")

//        val bindingClass = TypeSpec.classBuilder(className)
//            .addFunction(generateBindFunction(classDeclaration, properties))
//            .build()

        val companionObject = TypeSpec.companionObjectBuilder()
            .addFunction(generateBindFunction(classDeclaration, properties))
            .build()

        val bindingClass = TypeSpec.classBuilder(className)
            .addType(companionObject)
            .build()

        val file = FileSpec.builder(packageName, className)
            .addType(bindingClass)
            .build()

        file.writeTo(codeGenerator, Dependencies(true, *resolver.getAllFiles().toList().toTypedArray()))
    }

    private fun generateBindFunction(
        classDeclaration: KSClassDeclaration,
        properties: List<KSPropertyDeclaration>
    ): FunSpec {
        val targetClassName = ClassName(
            classDeclaration.packageName.asString(),
            classDeclaration.simpleName.asString()
        )
        val bindFunction = FunSpec.builder("bind")
            .addParameter("target", targetClassName)

        properties.forEach { property ->
            val bindViewAnnotation = property.annotations.first { it.shortName.asString() == "BindView" }
            logger.info("arguments--->${bindViewAnnotation.arguments}")
            val resourceId = bindViewAnnotation.arguments.first { it.name?.asString() == "value" }.value as String

            val propertyName = property.simpleName.asString()

            // 生成绑定代码:target.propertyName = target.findViewById(resourceId)
            bindFunction.addStatement("target.%L = target.findViewById(R.id.%L)", propertyName, resourceId)
        }

        return bindFunction.build()
    }
}

class BindProcessorProvider : SymbolProcessorProvider {
    override fun create(environment: SymbolProcessorEnvironment): SymbolProcessor {
        return BindProcessor(environment.codeGenerator, environment.logger)
    }

}
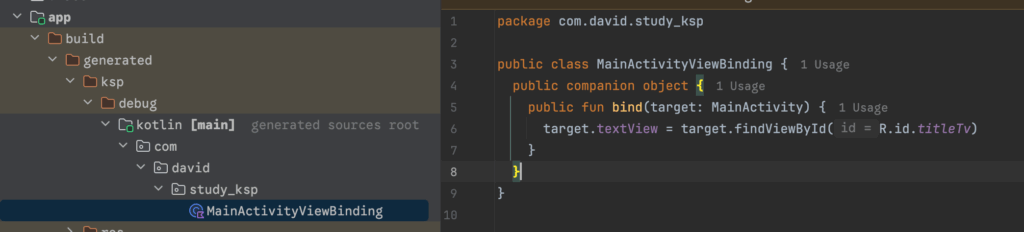
上面注解处理器主要作用是遍历项目中使用了BindView注解的成员变量,然后生成XXXViewBinding类,并创建静态方法bind(activity)。
(3)注册provider,有两种注册的方式。
注册方式1:在 resources/META-INF/services/com.google.devtools.ksp.processing.SymbolProcessorProvider 中写入实现类的全名。
注册方式2:使用AutoService注解。
引入依赖:
[libraries]
autoService = "com.google.auto.service:auto-service-annotations:1.1.1"
autoService-ksp = "dev.zacsweers.autoservice:auto-service-ksp:1.2.0"

dependencies {
   implementation(libs.autoService)
   ksp(libs.autoService.ksp)
}
在Provider类上面加上AutoService注解:
@AutoService(SymbolProcessorProvider::class)
class BindProcessorProvider : SymbolProcessorProvider {
    override fun create(environment: SymbolProcessorEnvironment): SymbolProcessor {
        return BindProcessor(environment.codeGenerator, environment.logger)
    }
}
以上两种方式任选一种即可。
执行./gradlew assembleDebug --info命令,在如下目录就能看到自动生成的文件。
(4)在app主项目中引入注解和注解处理器。
build.gradle.kts中配置如下:
plugins {
    alias(libs.plugins.ksp)
}

dependencies {
    ksp(project(":lib_processor"))
    implementation(project(":lib_annotations"))
}
MainActivity中使用注解:
class MainActivity : AppCompatActivity() {

    @BindView("titleTv")
    var textView: TextView? = null

    override fun onCreate(savedInstanceState: Bundle?) {
        super.onCreate(savedInstanceState)

        setContentView(R.layout.activity_main)

        MainActivityViewBinding.bind(this)

        textView?.text = "呵呵"
    }
}
通过以上,我们学习到:
·KSP基础:了解了如何创建 SymbolProcessor 和 SymbolProcessorProvider
·注解处理:学习如何解析注解参数和生成代码
·KotlinPoet使用:掌握代码生成库的基本用法
原创不易,转载请注明出处:https://www.longdw.com