百度地图提供的flutter插件,用起来还是很方便的,常规的需求基本都能满足。但是想在地图上自定义标注,比如实现下图的效果,可就没那么容易了。
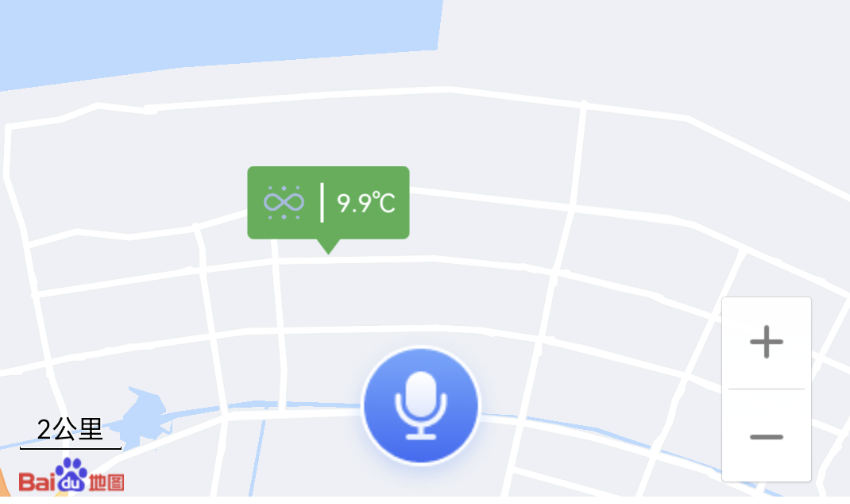
上图中,地图上绿色的标注是由widget布局出来的,其中矩形框的左边是一张图片,右边是文字(这不是废话吗,哈哈。。)。
原生的百度地图sdk仅支持自定义marker图片,以及传入bitmap,那如何实现图中的效果呢?
正当准备放弃研究的时候,无意间看到这个方法:
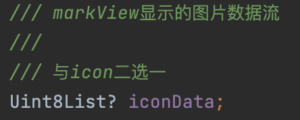
可以将图片数据流添加到地图上。
那现在的问题就转换为如何将widget转成Uint8List格式的图片数据流?
顺着这个思路查阅了一些资料,后来在这里找到了答案:https://gist.github.com/itsJoKr/ce5ec57bd6dedf74d1737c1f39481913。
import 'package:flutter/material.dart';
import 'dart:typed_data';
import 'package:flutter/rendering.dart';
import 'dart:ui' as ui;

/// This just adds overlay and builds [_MarkerHelper] on that overlay.
/// [_MarkerHelper] does all the heavy work of creating and getting bitmaps
class MarkerGenerator {
  final Function(List<Uint8List>) callback;
  final List<Widget> markerWidgets;

  MarkerGenerator(this.markerWidgets, this.callback);

  void generate(BuildContext context) {
    // WidgetsBinding.instance
    //     .addPostFrameCallback((_) => afterFirstLayout(context));

    afterFirstLayout(context);
  }

  void afterFirstLayout(BuildContext context) {
    addOverlay(context);
  }

  void addOverlay(BuildContext context) {
    OverlayState overlayState = Overlay.of(context);

    late OverlayEntry entry;

    entry = OverlayEntry(
        builder: (context) {
          return _MarkerHelper(
            markerWidgets: markerWidgets,
            callback: (List<Uint8List> bitmapList) {
              callback.call(bitmapList);
              // Remove marker widgets from Overlay when finished
              entry.remove();
            },
          );
        },
        maintainState: true);

    overlayState.insert(entry);
  }
}

/// Maps are embeding GoogleMap library for Andorid/iOS  into flutter.
///
/// These native libraries accept BitmapDescriptor for marker, which means that for custom markers
/// you need to draw view to bitmap and then send that to BitmapDescriptor.
///
/// Because of that Flutter also cannot accept Widget for marker, but you need draw it to bitmap and
/// that's what this widget does:
///
/// 1) It draws marker widget to tree
/// 2) After painted access the repaint boundary with global key and converts it to uInt8List
/// 3) Returns set of Uint8List (bitmaps) through callback
class _MarkerHelper extends StatefulWidget {
  final List<Widget> markerWidgets;
  final Function(List<Uint8List>) callback;

  const _MarkerHelper({
    Key? key,
    required this.markerWidgets,
    required this.callback,
  }) : super(key: key);

  @override
  _MarkerHelperState createState() => _MarkerHelperState();
}

class _MarkerHelperState extends State<_MarkerHelper> with AfterLayoutMixin {
  List<GlobalKey> globalKeys = <GlobalKey>[];

  @override
  void afterFirstLayout(BuildContext context) {
    _getBitmaps(context).then((list) {
      widget.callback(list);
    });
  }

  @override
  Widget build(BuildContext context) {
    return Transform.translate(
      offset: Offset(MediaQuery.of(context).size.width, 0),
      child: Material(
        type: MaterialType.transparency,
        child: Stack(
          children: widget.markerWidgets.map((i) {
            final markerKey = GlobalKey();
            globalKeys.add(markerKey);
            return RepaintBoundary(
              key: markerKey,
              child: i,
            );
          }).toList(),
        ),
      ),
    );
  }

  Future<List<Uint8List>> _getBitmaps(BuildContext context) async {
    var futures = globalKeys.map((key) => _getUint8List(key));
    return Future.wait(futures);
  }

  Future<Uint8List> _getUint8List(GlobalKey markerKey) async {
    RenderRepaintBoundary boundary =
    (markerKey.currentContext!.findRenderObject() as RenderRepaintBoundary);
    var image = await boundary.toImage(pixelRatio: 2.0);
    ByteData? byteData = await image.toByteData(format: ui.ImageByteFormat.png);
    return byteData!.buffer.asUint8List();
  }
}

/// AfterLayoutMixin
mixin AfterLayoutMixin<T extends StatefulWidget> on State<T> {
  @override
  void initState() {
    super.initState();
    WidgetsBinding.instance
        .addPostFrameCallback((_) => afterFirstLayout(context));
  }

  void afterFirstLayout(BuildContext context);
}
解释下上面的代码,核心的代码是:
void addOverlay(BuildContext context) {
    OverlayState overlayState = Overlay.of(context);

    late OverlayEntry entry;

    entry = OverlayEntry(
        builder: (context) {
          return _MarkerHelper(
            markerWidgets: markerWidgets,
            callback: (List<Uint8List> bitmapList) {
              callback.call(bitmapList);
              // Remove marker widgets from Overlay when finished
              entry.remove();
            },
          );
        },
        maintainState: true);

    overlayState.insert(entry);
  }
向Widget中插入OverlayEntry,OverlayEntry具体的内容是_MarkerHelper(xxx)。
_MarkerHelper就是一个普通的Widget,主要作用就是调用_getBitmaps(xxx)方法拿到Unit8List格式的数据流。
_MarkerHelper的build(xxx)方法用到了一个取巧的方式,它将需要获取Unit8List的widget创建在用户看不到的地方——Transform.translate(offset: Offset(MediaQuery.of(context).size.width, 0),),然后使用RepaintBoundary包住widget将重绘限制在widget内。
当布局完成时回调到afterFirstLayout(),这个方法里面将widget转换成Unit8List,最后回调给callback后调用entry.remove()移除entry。
使用方法如下:
MarkerGenerator([
_createWeatherMarker(weatherInfo, assetImage)
], (List<Uint8List> data) {
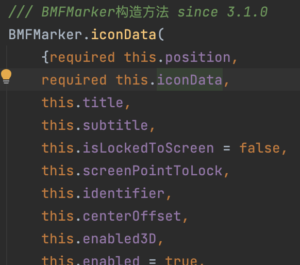
var marker = BMFMarker.iconData(
position: position,
iconData: data[0],
customMap: {"type": MapMarkerUtil.markTypeWeather}
);
_myMapController?.addMarker(marker);
}).generate(context);
Widget _createWeatherMarker(LiveWeatherInfo weatherInfo, ui.Image assetImage) {
    return SizedBox(
      width: 120,
      height: 60,
      child: Column(
        crossAxisAlignment: CrossAxisAlignment.center,
        children: [
          Container(
            padding: const EdgeInsets.all(8),
            decoration: const BoxDecoration(
                color: Colors.green,
                borderRadius: BorderRadius.all(Radius.circular(4))
            ),
            child: Row(
              mainAxisSize: MainAxisSize.min,
              children: [
                Image.asset("images/logo.png", width: 50, height: 50,),
                // Icon(IconData(0xe60b, fontFamily: "iconfont")),
                Padding(
                  padding: const EdgeInsets.symmetric(horizontal: 8),
                  child: Container(
                    width: 2,
                    height: 25,
                    color: Colors.white,
                  ),
                ),
                Text(
                  "${weatherInfo.tem!}℃",
                  style: const TextStyle(
                      color: Colors.white,
                      fontSize: 16
                  ),
                )
              ],
            ),
          ),

          CustomPaint(
            painter: TrianglePainter(),
            child: const SizedBox(
              width: 15,
              height: 10,
            ),
          )
        ],
      ),
    );
  }
这样就将widget显示到地图上了。但还是有问题,只能显示文字,图片的话只能显示Icon,如果要加载本地的图片,使用Image.asset是没法显示出来的。这样就不方便了,这需要把所有要显示到地图上的图片转换成Icon,这样搞美工不得打死我。
图片没法显示的原因我不太清楚,应该是没法直接将Image控件转换成Uint8List,那就试试将Image控件转成可通过Canvas绘制的Image,这有点像Android里面的ImageView和Bitmap的关系,前者是控件,后者是类似如二进制数据。
通过下面方法可以将本地的图片转成Image二进制。
Future<ui.Image> getAssetImage(String asset,{width,height}) async {
  ByteData data = await rootBundle.load(asset);
  ui.Codec codec = await ui.instantiateImageCodec(data.buffer.asUint8List(),targetWidth: width,targetHeight: height);
  ui.FrameInfo fi = await codec.getNextFrame();
  return fi.image;
}
要将Image二进制显示出来,需要借助CustomPaint。
CustomPaint(
  foregroundPainter:ImagePainter(assetImage),//画在child前面
  child: const SizedBox(
    width: 30,
    height: 30,
  ),
)
ImagePainter就跟Android里面自定义View差不多,拿到Canvas就可以绘制。
class ImagePainter extends CustomPainter {
  final ui.Image _imageFrame;
  ImagePainter(this._imageFrame):super();

  Paint selfPaint = Paint()
    ..color = Colors.blue
    ..style = PaintingStyle.fill
    ..isAntiAlias = true
    ..strokeCap = StrokeCap.butt;

  @override
  void paint(Canvas canvas, Size size){
    //绘制原图
    // canvas.drawImage(_imageFrame, Offset(0,0), selfPaint);

    /// 缩小图片尺寸绘制
    canvas.drawImageRect(
      _imageFrame,
      Rect.fromLTWH(0, 0, _imageFrame.width.toDouble(), _imageFrame.height.toDouble()),
      Rect.fromLTWH(0, 0, size.width, size.height),
      selfPaint,
    );
  }

  @override
  bool shouldRepaint(CustomPainter oldDelegate) {
    return true;
  }
}
就这样我们就实现了将Widget显示到地图上了。
原创不易,转载请注明出处:https://www.longdw.com。